How do I configure my Opayo payment account to use Paytia?
Three things before it works: find your Vendor Name, add our IP addresses as trusted in the Opayo portal, then finish the gateway setup in Paytia.
Adding IP Addresses to Opayo for Paytia Integration
To successfully integrate Paytia with your Opayo account, you must complete three key tasks:
1. Obtain Your Vendor Name
- Your Vendor Name is provided by Opayo and is essential for gateway setup. You will need to input this information into Paytia during the integration process.
2. Register Paytia as a Trusted IP Address
To ensure that the Paytia service is recognized by your Opayo account, follow these steps to add the service as a trusted IP address:
Log in to the Opayo Portal
- Use your admin or technical user credentials to access the Opayo portal.
Navigate to Settings
- Click on the Settings option located in the menu bar at the top.

- Click on the Settings option located in the menu bar at the top.
Access Valid IPs
- From the menu on the left-hand side, select Valid IPs. This will open a screen where you can view and add trusted IP addresses.
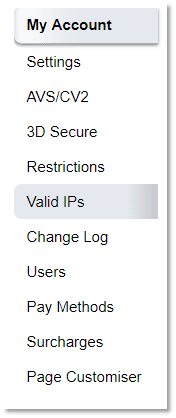
- From the menu on the left-hand side, select Valid IPs. This will open a screen where you can view and add trusted IP addresses.
Add a New IP Address
- Click the Add button located in the bottom-right corner of the page.
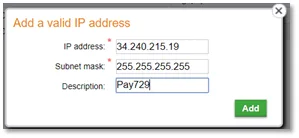
- A pop-up window will appear. Enter the following details:
- IP Address:
34.240.215.19 - Subnet Mask:
255.255.255.255 - Description:
Paytia
- IP Address:
- Click Add to save the new trusted IP address.
3. Enable MOTO Transactions on Your Opayo Merchant ID
For Paytia to process MOTO (Mail Order Telephone Order) payments, you need to ensure that your Opayo Merchant ID supports this functionality.
Contact Your Acquiring Bank
- Notify your acquiring bank or Opayo that you wish to enable MOTO payments on your merchant ID.
Request Additional Payment Services
- Ask your bank or Opayo to enable the following services on your Vendor ID:
- MOTO: Allows the processing of telephone orders.
- TX Authenticate: Verifies transaction data.
- TX Authorise: Authorizes transactions for payment.
- TX Token: Facilitates the creation of tokens for card data.
Completing these steps will ensure seamless integration between Paytia and your Opayo account for secure and efficient payment processing. If you encounter any issues during setup, contact Paytia support or refer to Opayo's documentation for further assistance.
More in Opayo
What does this error code from Opayo mean?
How to look up an Opayo error code and what usually causes them — most often an invalid character in the submitted data, or a reference that isn't unique.
Elavon Opayo Fraud rule controls
AVS and postcode checks, CV2, 3D Secure and Opayo's risk scores all need setting before you go live. Here's what each one does and how strict to make it.
How do I add a reserve amount to a credit card via Opayo?
Reserve and charge lets you hold an amount on a customer's card using Opayo's deferred option, without taking the money yet. Here's how to set one up.
Still need help?
Our support team is here to help. Submit a ticket and we'll get back to you within one business day.