Paytia portal · Payment rules
Payment rules watch for a condition — card type, country, amount, service key — and then act on it: hide a button, add a fee, or send the payment to a different gateway.
Managing Payment Rules
Payment rules let you attach your own business logic to the checkout. A rule watches for a condition — a card type, a country, a payment amount, a service key — and, when it matches, takes an action: show or hide a payment button, add a management fee, apply a fee plan, or route the payment through a chosen gateway. Rules are built from two reusable ingredients you create first — Payment plans (fee-by-amount tables) and BIN groups (card-matching groups) — then combined in the rule builder.
A · Build the ingredients Payment plans · BIN groups | B · Create the rule When this happens › Do this | C · The result Fee & buttons at checkout |
Go to Manage payments › Payment rules. Every rule on the account is listed here, showing the condition (When this happens), the action (Do this) and the rule’s Case type. The three buttons top-right are your starting points: Create Payment rules, Manage Plan and Create Bin Group.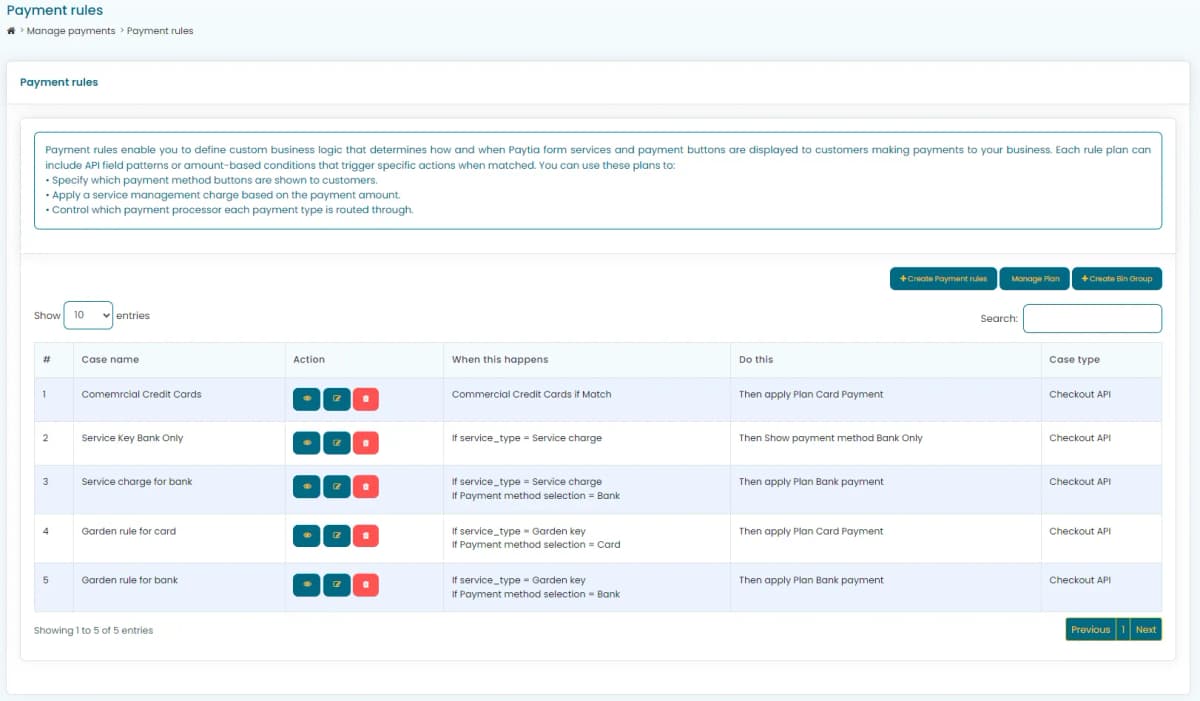
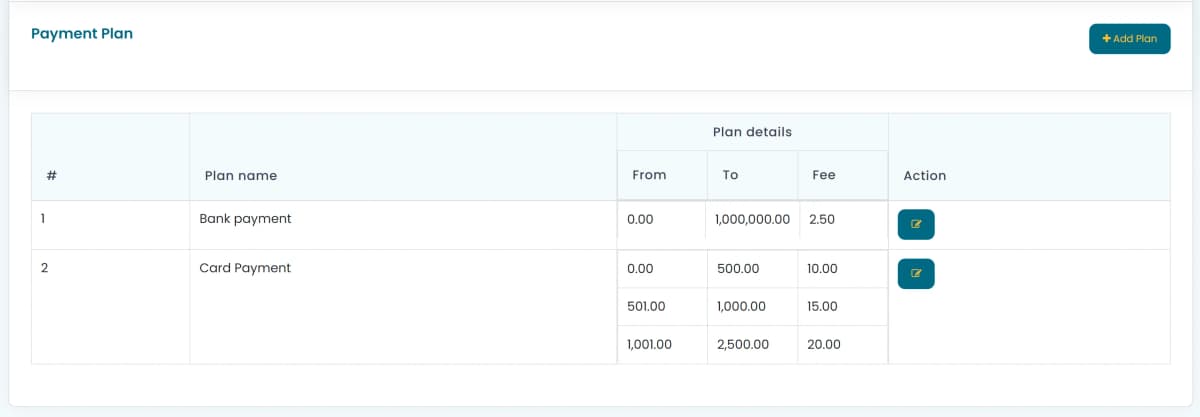
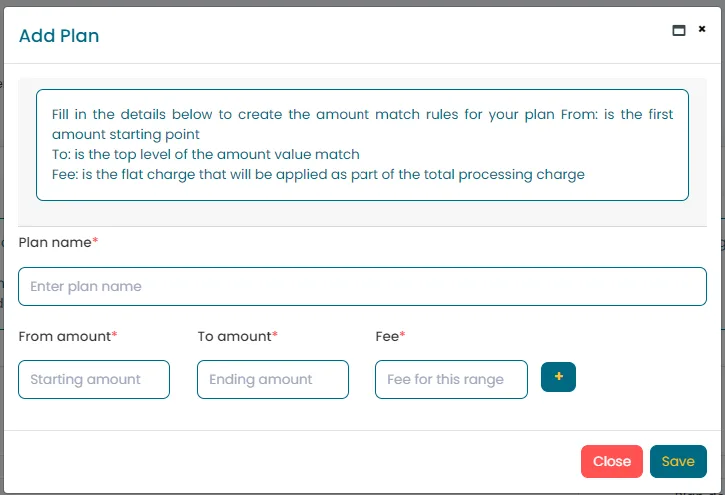
A Payment plan is a table of amount bands, each with a flat fee. When a rule applies a plan, Paytia finds the band the payment total falls into and adds that fee as a management charge. Click Manage Plan on the dashboard, then Add Plan. A single plan can hold several bands — here Card Payment charges £10 up to £500, £15 to £1,000 and £20 to £2,500.
A BIN group matches cards by their characteristics — Card Type, Card Brand, Card Category or Card Country — so a rule can react to “commercial credit cards” or “UK Amex” without you listing individual BINs. Click Create Bin Group on the dashboard, then Add Group. Each condition is a Field / Operator / Value triple, joined with AND or OR.
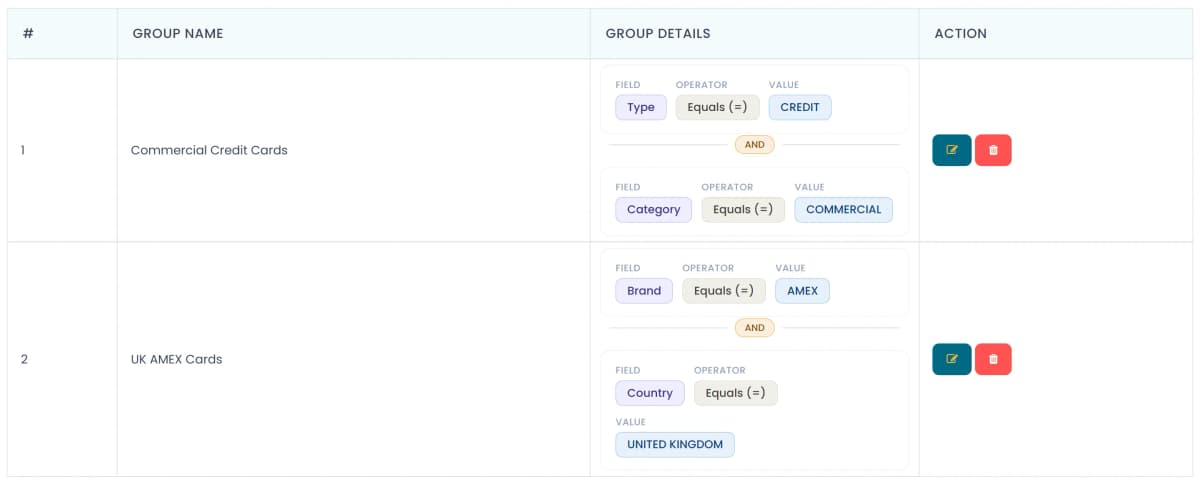
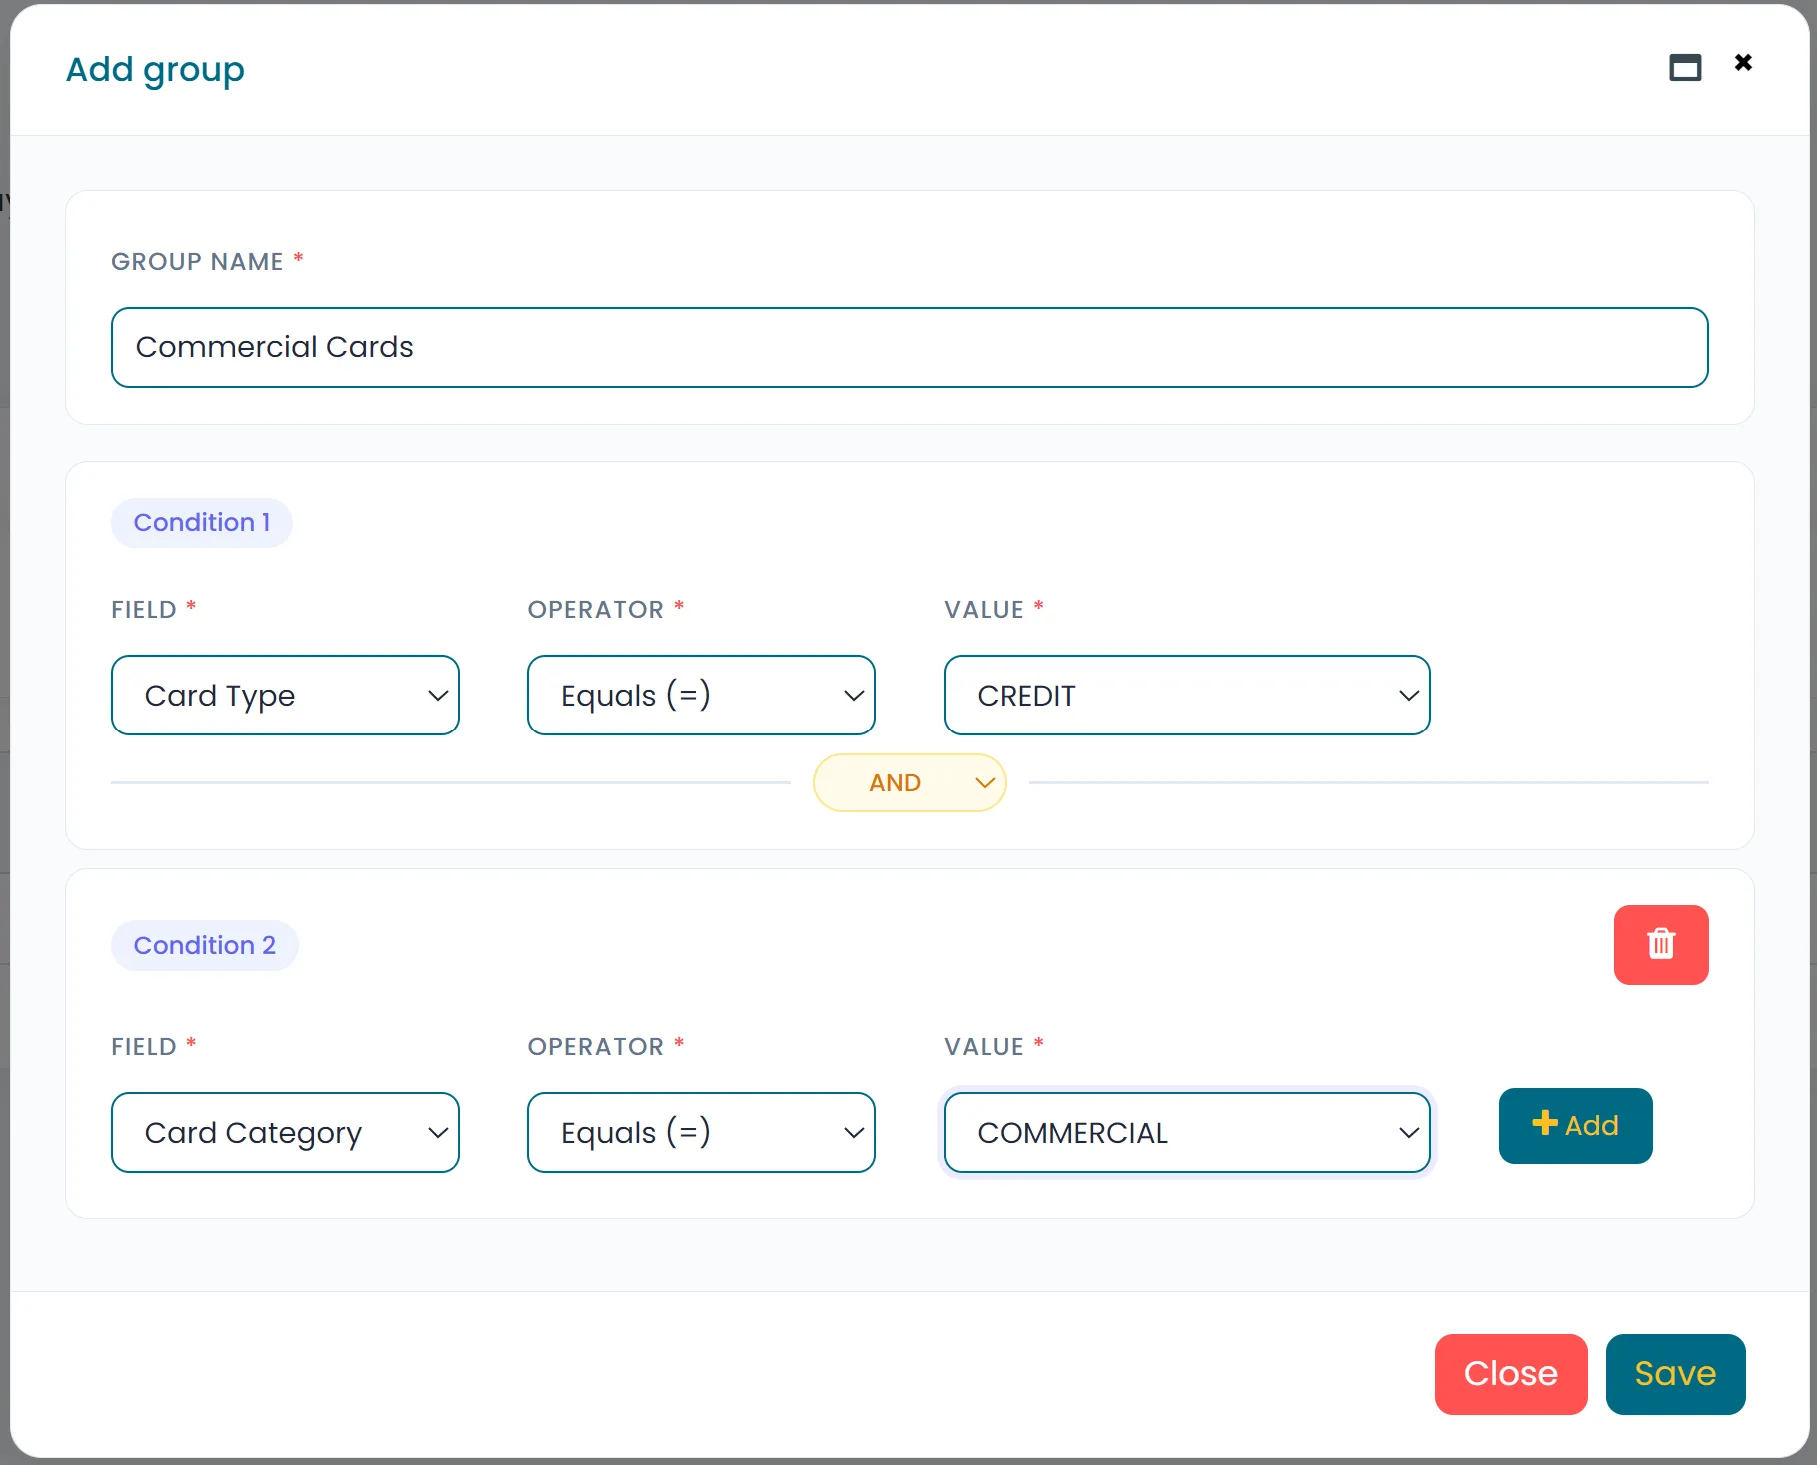
Field — the card attribute to test: Card Type (Credit / Debit / Charge Card), Card Brand (Visa, Amex…), Card Category (Personal / Commercial) or Card Country.
Operator — Equals (=) or Not Equals (!=).
AND / OR — the joiner between conditions. AND means every condition must match; OR means any one is enough.
+ Add — appends another condition. Use the red bin to remove one. Save to store the group.
Now tie it together. Click Create Payment rules. Name the case, choose where it applies (Select Type), define the trigger under When this happen, and pick the outcome under Do this. The panel on the left previews the rule as a When this happens → Take this action flow.
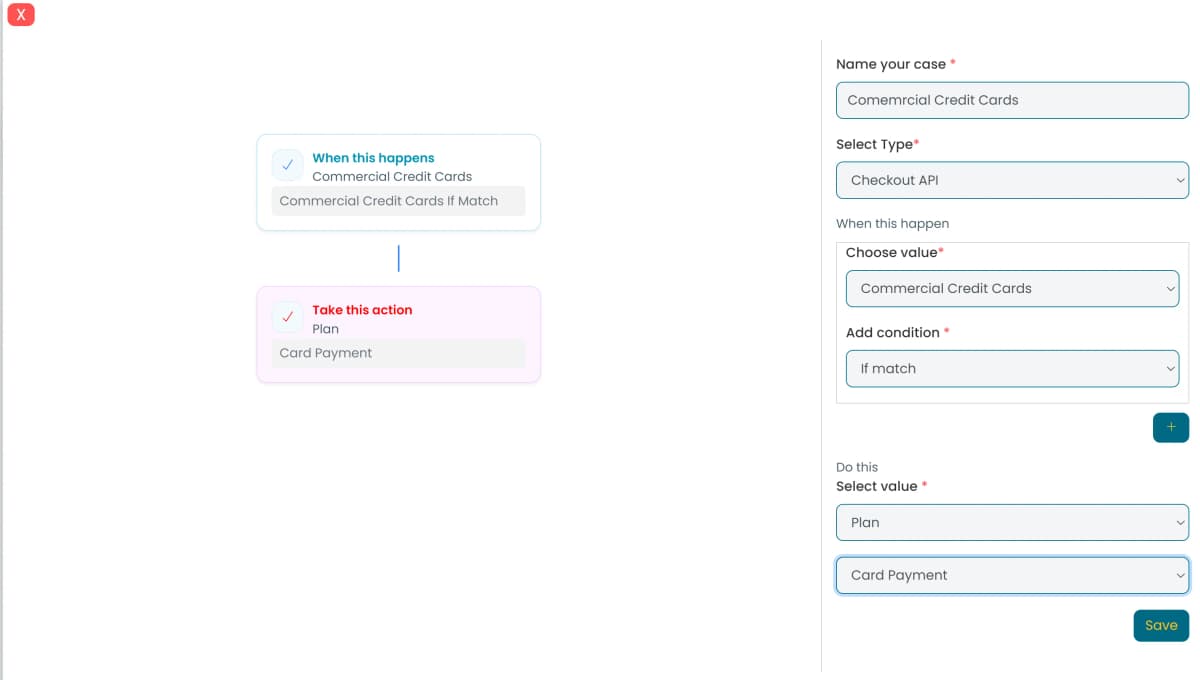
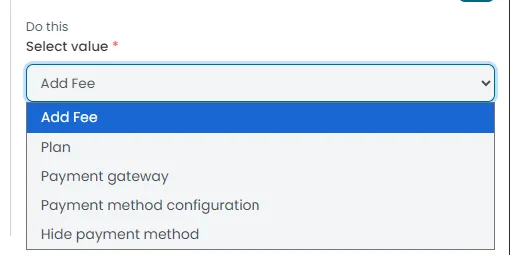
The Choose value dropdown is the trigger, and the Do this › Select value dropdown is the action:
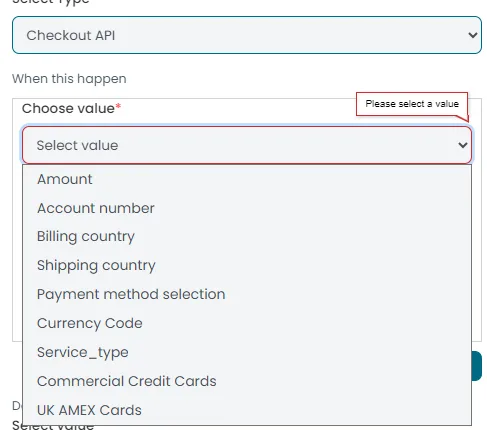
Select Type — where the rule runs: Checkout API, ACA User Interface (agent capture), or Both.
Choose value (the trigger) — Amount, Account number, Billing country, Shipping country, Payment method selection, Currency Code, Service_type, or any BIN group you created in step 03.
Add condition — the comparison: Equals / Not equals / Greater than / Less than / ≥ / ≤ for values, or If Match for a BIN group. Use the + to stack several conditions.
Do this (the action) — Add Fee (flat amount), Plan (apply a payment plan), Payment gateway (route to a processor), Payment method configuration, Hide payment method, or Show payment method.
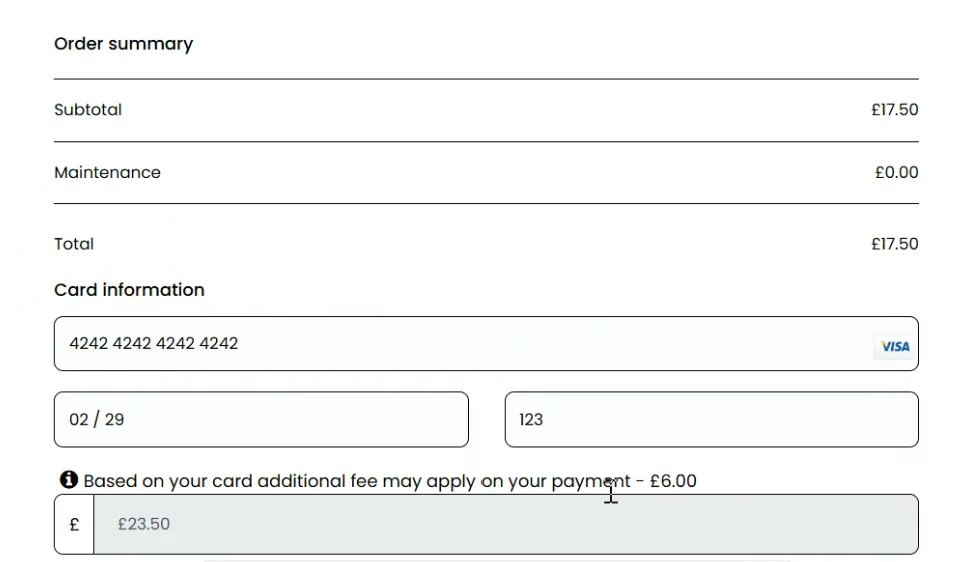
When a rule matches at checkout, the effect appears in the customer’s Order summary. Below, the entered card triggers the Commercial Credit Cards rule, so Paytia shows the additional fee and folds it into the amount to pay — the £17.50 subtotal plus a £6.00 rule fee gives the £23.50 total.
/ At a glance Ingredients first, then the rule. Create your fee plans and BIN groups, then a rule joins a condition to an action and applies it at checkout. | / Setup checklist ✓ Payment plan(s) created ✓ BIN group(s) created ✓ Rule named & type chosen ✓ When-this-happens condition set ✓ Do-this action selected & saved | / Need help? Paytia support. If a rule doesn’t fire, check the Case type matches where you’re testing (Checkout API vs ACA) and that the plan or BIN group it points to still exists. |
More in Payment rules
Sub-Company profile creation
Sub-Company profiles let one account take payments for several brands, each with its own branding and configuration. You'll need the Sub-Company Control licence.
User prompts in Agent Capture Assist
User prompts put whatever your agents need on screen while they take a payment — a script, a help link, a reminder. There's a text editor and a code view.
Using test cards with the Paytia service
Test mode lets you run a full payment with a dummy card, so you can check the setup end to end without any money moving.
What telephone number do I enter so that customers call me?
This is the number we ring when a payment call comes in for you. Pick the country code and leave off the leading zero.
Adding custom fields to capture more payment information
Custom fields is a paid add-on. Once it's on you can capture extra values through Agent Capture Assist or the API, store them in the transaction log, and pass them to your gateway as metadata.
Can I have more than one merchant ID?
Yes. You can run several Merchant IDs under one gateway and pick between them at the point of payment. Here's how to add the second one.
Still need help?
Our support team is here to help. Submit a ticket and we'll get back to you within one business day.